Data Gateway
Overview
The Data Gateway in Blocks Cloud provides a unified interface for managing, modeling, and accessing your application data. Through Data Gateway, users can easily define schemas, manage data relationships, and securely interact with data using automatically generated GraphQL endpoints. This reduces the need for complex backend configurations and allows teams to focus on building their applications faster.
Configuring a Data Source
Users can use Block Cloud's data which will be hosted on Block Cloud's infrastructure. Or you can choose to bring your own data for example if you have data in Mongo Atlas or other similar data hosting services.
Use Blocks Cloud's Data
To use Blocks Cloud's data, click the "Configure" button. Select the "Blocks Database" option.

Setup your own data source
If the users wishes to use their own data source then they must specify the connection URL and the name of the database.
Creating a Schema
Users can define their own schema. In order to add a schema, click on the Add button in the "Schemas" section. Select "Entity" when the schema defines a table or a collection in the databse. Select "Child" to create a nested object.
Changes made in the app will not be impacted until the reload button is pressed in the Schemas section
Editing a Schema
Newly created schemas will have some default properties. Users can choose to delete them.
In order to edit a schema click on the "Edit" button in the Schema Structure section. Users will be able to add properties, delete properties, rename properties, change the data type, declare whether properties are arrays or not, and change the access level for each property.
Editing Properties
Users can edit multiple properties at once by selecting multiple properties by clicking on the checkbox on the left of each property.
Deleting Properties
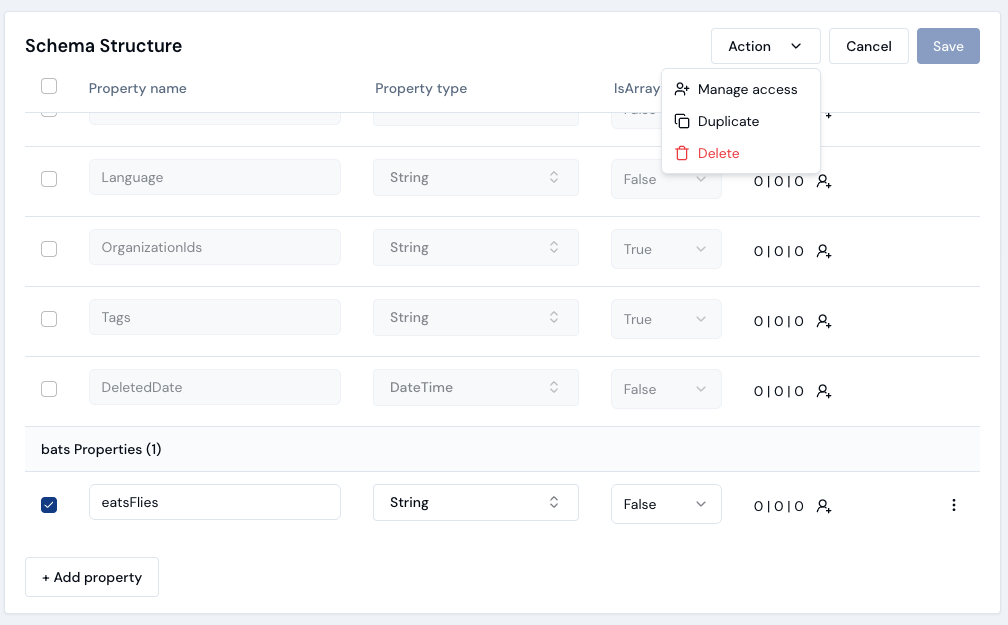
To delete a propery, click on "Edit" in the Schema Structure section. Select the property/properties you want to delete by click on the corresponding checkboxes on the left. Click on Action, then click on delete.

Any changes made in the schema will not reflect in the API calls until "Reload" is pressed.
Consuming the data
Once the schemas have been provided, users would be able to do CRUD operations using GraphQL endpoints. In order know what endpoint to hit to interact with the data, click on the "Preview" button in the Schema Structure section.
Authorization
Blocks Cloud offers Row level Security (RLS) and Column Level Security (CLS) for the schemas you create.
Row Level Security
In order to configure the Row Level Security, click on "Schema Access" in the "Basic Information" section.
Navigating row level access is very similar to Column level access. The difference is in applying the changes. The way to apply the changes would be to activate the switch labeled "Row Level Security" on the top right of the panel.
Column Level Security
In order to configure the Column Level Security, click on "Edit" in the Schema Structure. Select the properties that you want to edit the permissions for by clicking on the checkboxes on the left, then Click on the "Action" dropdown and select "Manage Acess". Users can also edit the column level access by click on the user icon in the "Access" column.
- The number indicates how many users currently have access to the item (e.g., a project, service, or schema).
- Both the number and the user icon are clickable. Clicking either will open the Access Management panel, where you can view, add, or remove users with access permissions.
Each schema allows you to configure access controls for its properties under three categories: View, Write/Edit, and Delete. These define what actions different users or roles can perform on the schema’s data.
Within each access type (View, Write/Edit, Delete), you can assign permissions to three different kinds of actors:
- Role-based Access: Grant permissions to all users who belong to a specific role.
- User-based Access: Assign access to individual users.
- Permission-based Access: Grant access based on predefined permissions or policies within Blocks Cloud.
See how to configure roles and permissions here.
You can add multiple access configurations under each access type.
To configure access:
- Open the Access panel for your schema.
- Select one of the access types — View, Write/Edit, or Delete.
- Click Add to create a new access rule.
- Choose the Type (Role, User, or Permission) and then select the corresponding Name from the dropdown.
- Repeat the process to add additional access rules as needed.
- Click Save to apply your changes.
You can combine multiple access types under each category — for example, give both a role and a specific user “View” access to the same schema.
To migrate from one environment to the other, please follow Environment Migration