Getting Started
This guide walks you through each of these steps to help you quickly set up and manage your projects in Blocks OS. To get started, please go to the OS Portal.
User Registration
Signing Up with Email
Users can create an account using their email address. Enter the required details such as name, email, and password. A verification email will be sent — clicking Verify Email activates the account and grants access to the Blocks OS Console.
Signing Up with SSO
Users can alternatively register using supported Single Sign-On (SSO) providers. Blocks currently supports:
- GitHub
- Microsoft
- X
After selecting an SSO option, the user is authenticated through the provider, and the Blocks OS account is created automatically.
Blocks OS Console
The Console section introduces you to the core workflow for creating and managing projects within the Blocks OS Console. From here, you can view all your projects at a glance, create new ones, connect repositories, and configure deployment environments — all in one place.
See all your projects in the Blocks OS Console. Click on the Main logo on the top left to navigate to the Project Settings Menu page.
You can create a maximum of 10 projects
Project Creation
Initiating a new project
Click on "Add Project" to create a new project. You will be taken to a new page. Enter a project name here and accept the terms and conditions.
Adding a Repository
There is an optional step to add a repository. This step is important for users who wish to deploy their project using the Blocks OS platform. The user connects to GitHub via SSO. Once connected, the available repositories are listed. Users can select a repository and add it to the project.
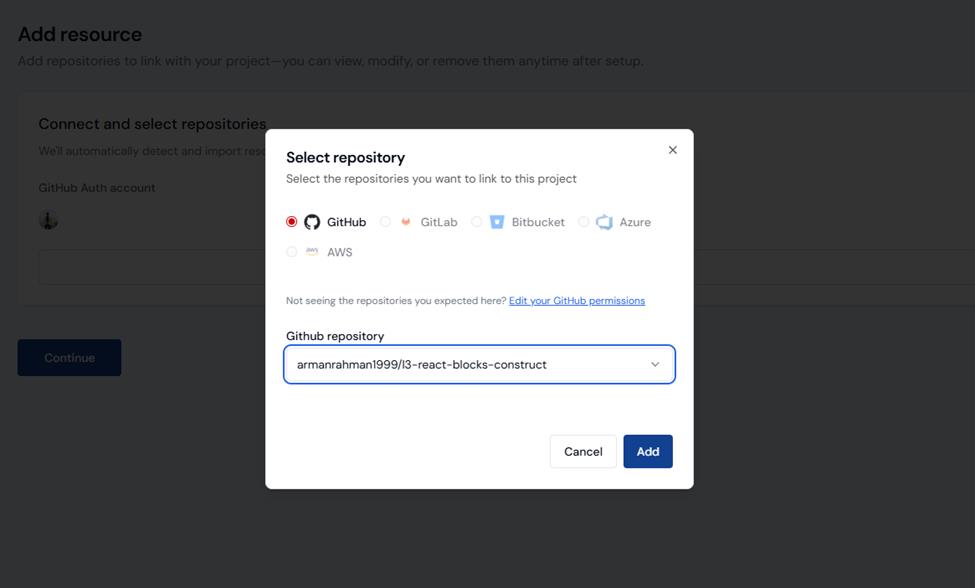
Make sure you have a corresponding branch in your repository if you want to deploy using Blocks OS. See the table below for the proper branch names.
Access to the chosen version control system (e.g. GitHub) can be revoked in the "Select Repository" modal by clicking on "Edit your GitHub Permissions"
Environment Selection
The system prompts the user to select the number of required environments. The user selects a single environment for this demo. Submission leads to final project creation with the chosen environment.
If users wish to deploy using Blocks OS, corresponding branches must also exist. For example, in order to deploy in development, the system will automatically look for the “dev” branch. The following is a list of supported environments and their corresponding branches:
| Environment | Branch |
|---|---|
| Development | dev |
| Testing | test |
| Staging | stg |
| IAT | iat |
| UAT | uat |
| Prod Shadow | prod-shadow |
| Pre-Prod | pre-prod |
| Production | main |
Project Settings Menu
The Project Settings Menu is the central location for managing all project-level configuration and administrative controls. It is accessible from the sidebar, which exposes four main sections:
- Environments
- People
- Repositories
- Settings
Environments
The Environments section allows users to access and manage the different environments within a project. Access rights and capabilities differ depending on the user's role.
User Roles
There are two types of users within a project:
- Owner — The user who created the project. The project creator automatically becomes the Owner. Only one Owner can exist at a time. Ownership can be transferred to another accepted project member at any point.
- General User — All other project members who have been invited and accepted their invitation.
Environment Access Control
The Owner has full control over environments:
- Can view all existing environments.
- Can create new environments.
- Can manage (grant or revoke) environment access for other users.
- Cannot edit their own environment access — this is by design to prevent accidental lockout. The Owner has inherent access to all environments they create.
General Users have restricted access:
- Can only access environments they have been explicitly granted permission to.
- Cannot create new environments.
- Cannot modify environment permissions for themselves or others.
Environment Migration
A Migration Feature allows services to be moved from a source environment to a destination environment. Migration can be performed by all users, regardless of role, as long as they have access to the relevant environments.
You can migrate data from one environment to another. On the Project Settings Menu page, click Start Migration to go to the migration page.

- Select the source environment from the dropdown on the left and the target environment on the right.
- Select the services you want to migrate.
- Enable Overwrite Data if you want to overwrite existing data in the target environment.
- Click Continue at the bottom to go to the Review page. Review your changes here and start the migration!
Not all the data in any given service will be migrated. Each service allows its own set of data that can be migrated.
Localization-specific behavior:
- If the IDs are the same in both environments and Overwrite Data is enabled, existing keys in the target environment will be overwritten.
- New keys from the source environment will be added to the target environment, while keys that exist in the target environment but not in the source environment will remain unchanged.